
Want to truly unlock your Android’s potential? Looking to delve deeper into the world of custom ROMs, modifications, and backups? Then you’ve come to the right place. This comprehensive guide will walk you through the process of installing TWRP recovery, a powerful tool that opens up a world of customization options for your Android device. TWRP, or Team Win Recovery Project, is a custom recovery environment that replaces your stock Android recovery. It provides a touchscreen interface with a host of features, enabling you to install custom ROMs, create and restore backups, root your device, and much more. Understanding how to install TWRP is the first step towards taking full control of your Android experience.
This guide provides a step-by-step approach to installing TWRP recovery, catering to users of varying technical levels. We will cover key aspects, from understanding the prerequisites and downloading the correct TWRP image for your specific device, to the actual installation process using methods like fastboot. Whether you’re a seasoned Android enthusiast or a newcomer looking to explore the world of customization, this guide aims to equip you with the knowledge and confidence to successfully install TWRP and unlock the true potential of your Android device.
Understanding TWRP Recovery and Its Benefits
TWRP (Team Win Recovery Project) is a custom recovery environment for Android devices. It replaces the stock recovery software, offering a powerful suite of tools for managing and modifying your device’s software.
Unlike the limited functionality of stock recovery, TWRP allows for advanced operations. These include installing custom ROMs (alternative operating systems), creating and restoring backups of your entire system, and flashing ZIP files containing modifications like root access or custom kernels.
Key benefits of using TWRP include:
- Complete Backups: Safeguard your data with comprehensive backups, allowing you to revert to a previous state if something goes wrong.
- Custom ROM Installation: Explore a world of custom ROMs offering enhanced features, performance improvements, and a stock Android experience.
- System Modification: Easily flash ZIP files containing various modifications, such as rooting your device, installing custom kernels, and more.
- Advanced Troubleshooting: TWRP facilitates advanced troubleshooting options, enabling you to fix software issues or restore your device to a working state.
Prerequisites for TWRP Installation
Before you begin installing TWRP, ensure you’ve met the following requirements. These steps are crucial for a successful installation and will help avoid potential problems.
Unlocked Bootloader: This is perhaps the most important prerequisite. An unlocked bootloader allows you to modify the system partition and install custom recoveries like TWRP. The process for unlocking the bootloader varies by device manufacturer and model. Consult your device’s specific instructions.
Compatible TWRP Image: Download the correct TWRP image file specifically designed for your Android device model. Installing an incorrect image can lead to a bricked device. Double-check compatibility on the official TWRP website or reputable forums.
ADB and Fastboot Drivers: These tools are essential for communicating with your Android device from your computer. Install the necessary ADB and Fastboot drivers on your computer. These can often be found as part of the Android SDK Platform Tools.
Sufficient Battery Charge: Ensure your Android device has a sufficient battery charge, ideally above 50%, to prevent interruptions during the installation process. A power outage mid-installation can severely damage your device.
Backup Important Data: While TWRP itself is used for backups, it’s always a good practice to back up your important data to a separate location before proceeding. This precaution safeguards against unexpected data loss.
Enabled USB Debugging: Enabling USB debugging in your Android device’s developer options allows your computer to communicate with the device for installing TWRP. Refer to your device’s documentation on how to enable developer options and USB debugging.
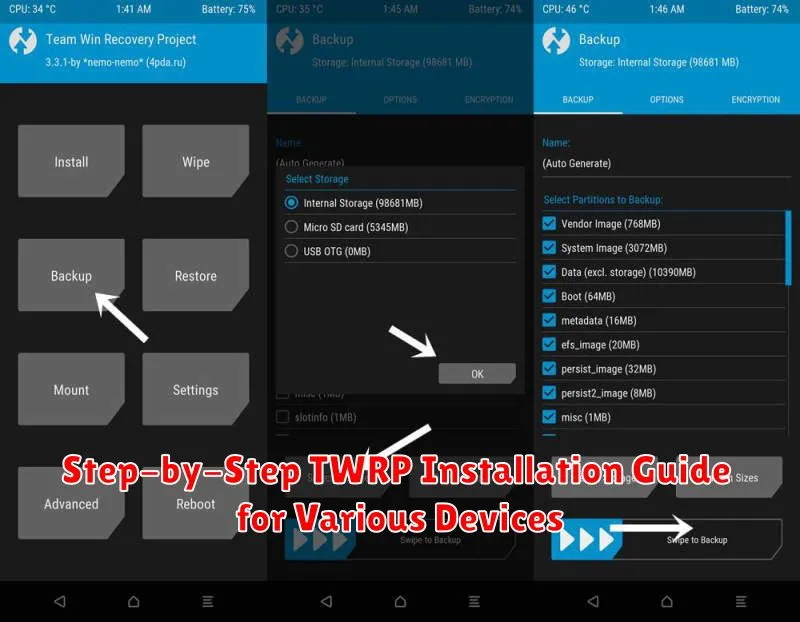
Step-by-Step TWRP Installation Guide for Various Devices
The TWRP installation process varies depending on your device’s manufacturer and model. However, the general steps remain similar. It’s crucial to find device-specific instructions for your particular Android device. This guide offers a generalized overview, but consult your device’s specific forums or communities like XDA Developers for detailed guidance.
General Installation Steps:
- Unlock the Bootloader: This is a mandatory step. The process differs across manufacturers and may void your warranty.
- Download the Correct TWRP Image: Ensure you download the correct TWRP image file (.img extension) specifically designed for your device model. Using an incorrect image can lead to a bricked device.
- Install ADB and Fastboot: These tools are essential for communicating with your device. Download and install the platform-tools package from the Android Developers website.
- Boot into Fastboot Mode: Usually achieved by holding a combination of buttons while powering on your device. Consult your device’s documentation.
- Connect Your Device to Your Computer: Use a USB cable to connect your device to your computer while in Fastboot mode.
- Flash the TWRP Image: Open a command prompt or terminal on your computer, navigate to the directory containing the downloaded TWRP image, and execute the fastboot flash recovery command followed by the image file name.
- Reboot into Recovery: After successful flashing, reboot your device into recovery mode to access TWRP.
Note: These steps are general guidelines. Specific commands and procedures may vary. Always refer to device-specific instructions before proceeding.
Troubleshooting Common TWRP Installation Issues
Encountering problems during the TWRP installation process is not uncommon. This section addresses frequent issues and provides potential solutions.
Device Not Recognized by Computer
If your computer doesn’t recognize your Android device, ensure you have the correct USB drivers installed. Try a different USB cable and USB port. Verify that USB debugging is enabled in your device’s developer options.
“FAILED (remote: ‘unknown command’)” Error
This error often suggests an incompatibility between the TWRP version and your device. Double-check that you have downloaded the correct TWRP image for your specific device model.
Stuck in Bootloop After Installation
A bootloop after TWRP installation can indicate a problem with the flashing process. Try re-flashing the TWRP image. If the issue persists, it might be necessary to restore your device’s original firmware.
“Error 7” or Similar Errors
These errors usually point to a problem with the TWRP image or an incompatibility with your device’s partition layout. Ensure you are using the correct TWRP version designed for your specific device variant. Consulting online forums dedicated to your device can often provide model-specific solutions.
Essential Tips for a Smooth TWRP Installation
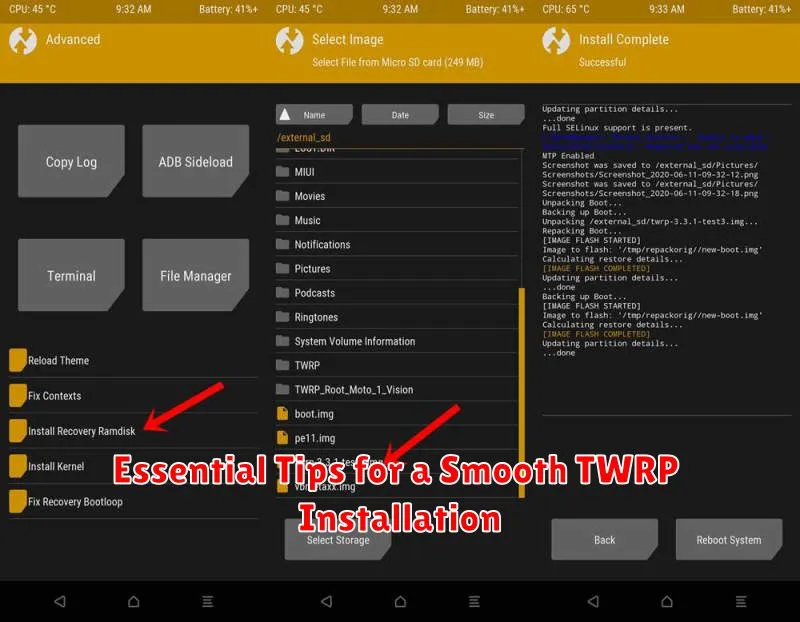
A successful TWRP installation hinges on careful preparation and attention to detail. Following these tips can significantly reduce the chance of encountering problems.
Battery Life: Ensure your device has sufficient charge before beginning. A minimum of 50% battery is recommended to prevent interruptions during the process.
Backup Your Data: The TWRP installation process itself shouldn’t erase data. However, it’s crucial to back up important files as a precaution against unforeseen issues.
Verify Downloads: Double-check that you’ve downloaded the correct TWRP image file for your specific device model. Using an incorrect file can lead to device malfunction.
Follow Instructions Carefully: The installation process can vary slightly between devices. Adhere strictly to the instructions provided for your particular phone or tablet.
Patience is Key: The installation process may take some time. Avoid interrupting the process unless specifically instructed to do so.
Exploring Advanced TWRP Features and Usage
Once you’ve successfully installed TWRP, you can leverage its advanced features beyond basic recovery. TWRP offers a powerful toolkit for managing and customizing your Android device.
Advanced Backup and Restore Options
TWRP allows for granular backups, enabling you to select specific partitions like system, data, boot, and more. This provides flexibility in restoring only necessary components, saving time and storage space. You can also create image backups of individual partitions for advanced modifications.
File Management
TWRP’s built-in file manager allows you to browse, copy, move, and delete files on your device’s storage. This can be useful for transferring ROM zip files, managing backups, or troubleshooting file system issues.
Flashing Custom ROMs and Modifications
Beyond backups, TWRP facilitates flashing custom ROMs, kernels, and other modifications. The Install option in TWRP lets you navigate to zip files on your storage and flash them to your device. This is a core function for users seeking a customized Android experience.
Terminal Emulator
For advanced users, TWRP includes a terminal emulator, providing a command-line interface directly on your device. This enables executing shell commands for troubleshooting, scripting, and system-level modifications.