
Is your phone constantly reminding you about low storage? Are you struggling to capture precious moments due to a full memory? Expanding your phone’s storage capacity can be a simple and cost-effective solution. This step-by-step guide will walk you through the process of inserting a memory card into your phone, allowing you to store more photos, videos, apps, and files without the frustration of constant storage limitations. Learn how to expand your storage and reclaim valuable space on your device with this easy-to-follow tutorial.
Whether you’re dealing with a full memory card or are simply looking to expand your storage options, understanding how to properly insert and utilize a memory card is essential. This guide will cover everything from identifying the correct memory card slot on your phone to safely inserting and preparing the card for use. By following these instructions, you can quickly and easily increase your phone’s storage, ensuring you have ample space to capture and store all your important data.
Understanding Memory Card Compatibility
Before purchasing a memory card, it’s crucial to determine your phone’s compatibility. Different phones support different types and sizes of memory cards.
Check your phone’s specifications: The easiest way to identify compatible memory cards is to consult your phone’s user manual or the manufacturer’s website. Look for information on the supported memory card type (e.g., microSD, microSDHC, microSDXC) and the maximum capacity.
Understanding memory card types:
- microSD (micro Secure Digital): Offers capacities up to 2GB.
- microSDHC (micro Secure Digital High Capacity): Offers capacities from 4GB to 32GB.
- microSDXC (micro Secure Digital Extended Capacity): Offers capacities from 64GB and beyond.
Using an incompatible card can lead to performance issues or prevent the card from being recognized by your device. Using a card with a higher capacity than your phone supports may not damage the device, but the extra storage may be unusable.
Preparing Your Phone and Memory Card
Before inserting the memory card, it’s crucial to prepare both your phone and the card itself to prevent data loss or damage. First, power off your phone completely. This is a vital step to avoid any potential electrical issues. Do not simply put your phone to sleep; ensure it is fully powered down.
Next, if you’re reusing a memory card that was previously in another device, it’s a good idea to back up its contents to your computer. This ensures you don’t lose any important files during the formatting process, which we’ll cover later.
Finally, gently remove the memory card from its packaging if it’s new or from its previous device. Handle the card with care, avoiding touching the metallic contacts. Inspect the card for any visible damage. If the card appears damaged, do not proceed with the installation.
Locating the Memory Card Slot
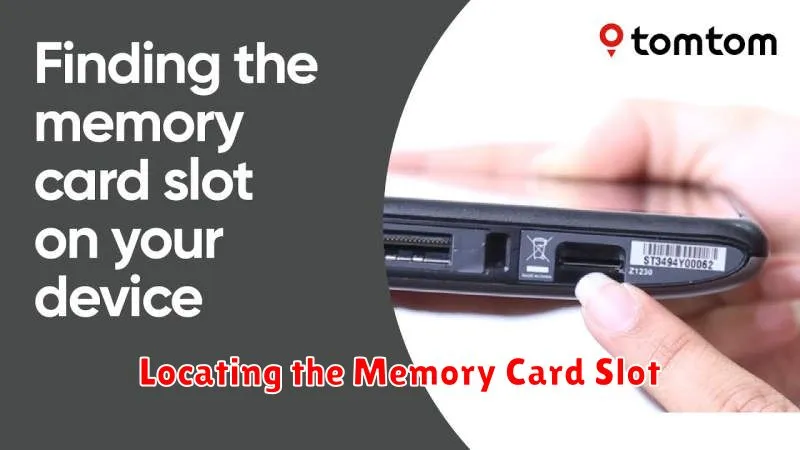
The location of the memory card slot varies depending on your phone’s make and model. Most modern smartphones incorporate the memory card slot into a combined tray that also houses the SIM card. Older phones might have a dedicated, separate slot for the memory card.
Consult your phone’s user manual. This is the most reliable method to pinpoint the exact location. The manual will typically include a diagram highlighting the slot’s position.
Visually inspect your phone. Carefully examine the edges of the device. Look for a small tray with a pinhole opening. This is usually the SIM/memory card tray. Some phones may have a small cover or flap protecting the slot.
For phones with removable batteries, the memory card slot might be located underneath the battery. Power off the device, remove the back cover and battery, and then look for the designated slot.
Inserting the Memory Card Correctly
Once you’ve located the memory card slot, gentle and precise insertion is key to avoid damaging the card or the slot. Orientation is crucial. Examine the memory card for a notch along one of its short edges. This notch corresponds to a small ridge or tab within the memory card slot.
Align the notch on the memory card with the ridge in the slot. The card should fit snugly and slide in smoothly. Do not force the card if it encounters resistance. Double-check the orientation and try again. A slight click may indicate that the card is securely in place.
Depending on your phone model, the memory card may sit flush with the phone’s casing or protrude slightly, allowing for easy removal later.
Formatting the Memory Card for Use
Once the memory card is inserted, you’ll likely need to format it. Formatting prepares the card for use with your specific phone and erases any existing data. Be absolutely sure to back up any important files from the card before formatting, as this process is irreversible.
The formatting process usually begins automatically after inserting the card. If it doesn’t, you can manually format it through your phone’s settings. Typically, this can be found in the storage or memory card section of your phone’s settings menu. Look for options like “Format SD card” or “Erase SD card.”
Your phone will likely offer two formatting options: internal storage and portable storage.
- Internal storage: Formats the card to act as an extension of your phone’s internal storage. This is ideal for apps and app data.
- Portable storage: Formats the card for media storage, such as photos, videos, and music. This is a more universally compatible format.
Choose the option that best suits your needs. After confirming your choice, the formatting process will begin, and your phone will notify you once it’s complete.
Transferring Files to the Memory Card
Once your memory card is inserted and formatted, you can begin transferring files. There are several ways to move your photos, videos, music, and documents to the new card.
Using Your Phone’s File Manager
Most phones have a built-in file manager app. Open this app, locate the files you wish to transfer, select them, and look for an option like “Move” or “Copy.” Choose your memory card as the destination.
Connecting to a Computer
You can also connect your phone to a computer via USB. Your phone’s storage, including the memory card, should appear as a drive on your computer. You can then drag and drop files between your computer and the memory card as needed. Ensure to safely eject your phone from the computer when finished.
Utilizing Cloud Storage Services
If you use cloud storage services like Google Drive, Dropbox, or OneDrive, you can often download files directly to your memory card from within the app.
Troubleshooting Memory Card Issues
Occasionally, you might encounter issues with your memory card. This section outlines common problems and their solutions.
Card Not Detected
If your phone doesn’t detect the card, ensure it’s inserted correctly and fully seated in the slot. Try restarting your phone. If the issue persists, test the card in another compatible device to determine if the card or the phone slot is faulty.
Slow Transfer Speeds
Slow transfer speeds can indicate a problem with the card’s speed class. Consider using a higher-speed card (e.g., UHS-I or UHS-II) for improved performance. Also, ensure your phone supports the card’s speed class.
Corrupted Files
If files on the card are corrupted, try recovering them using data recovery software on a computer. Formatting the card will erase all data but can resolve corruption issues. Always back up important files before formatting.
Card Unreadable
If the card is completely unreadable, it might be permanently damaged. Unfortunately, data recovery may be impossible in this scenario. Consider replacing the card.